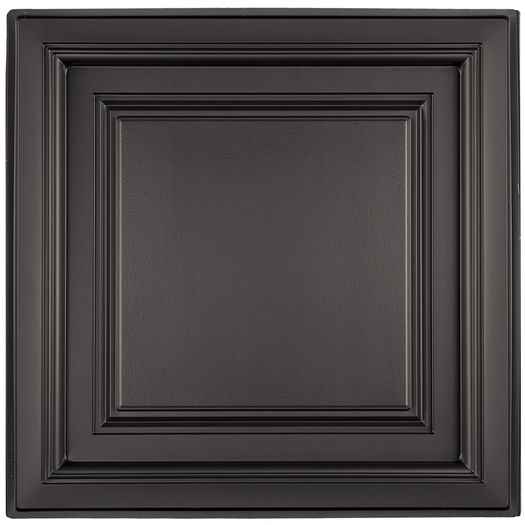
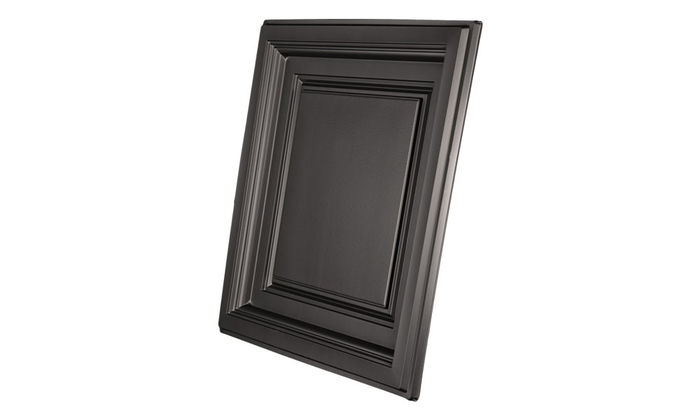
Easy Elegance Deep Black Coffered Ceiling Tiles
-
-
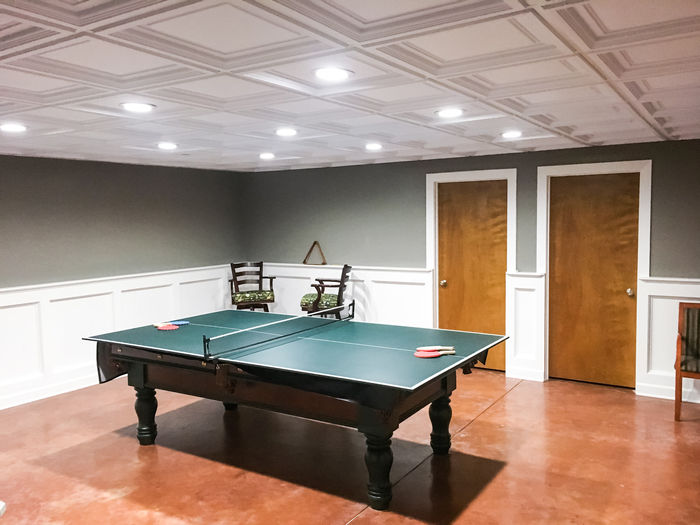
Create a Coffered look with ease
-
-
Black Grid Strips (Shown with the Stratford Tile)
-
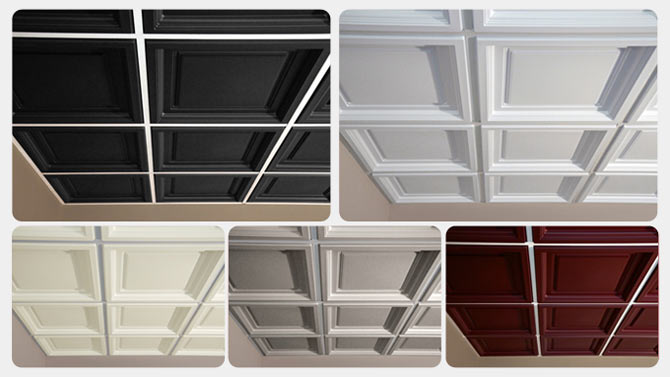
A color for every taste and style
-
Specifications
-

-
Dimensions 2' x 2'
-
Color Black
-
Material Vinyl
-
Thickness .013" - Cuts easily with scissors
-
Weight 6.4 oz
-
Projection 0.50" from tile face
-
Recession 1.50" from tile face
-
Brand ProLite
-
Special Instructions Not recommended for installations
where ceiling temperatures exceed 120�F -
Print/Download Product Spec Sheet
Videos
-
Product Video
-
Cutting Tiles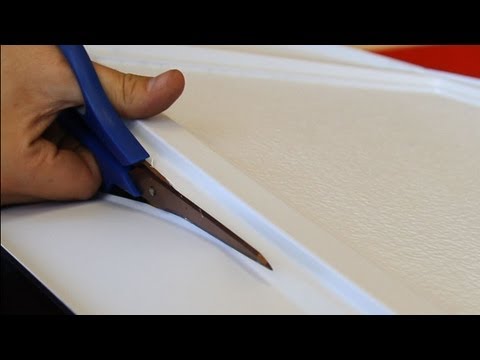
-
Border Tiles
-
ProLite Certifications
-
Your Old Ceiling Tiles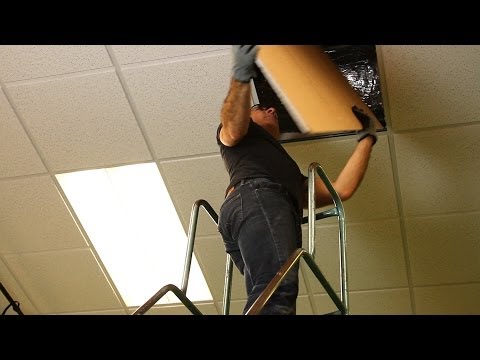
Related Products
Similar Tiles

$ 3 . 49 / sq. ft. ($13.95 / tile)

$ 1 . 74 / sq. ft. ($6.95 / tile)

$ 3 . 49 / sq. ft. ($13.95 / tile)

$ 3 . 49 / sq. ft. ($13.95 / tile)

$ 1 . 75 / sq. ft. ($69.99 / box)

$ 1 . 99 / sq. ft. ($7.95 / tile)

$ 1 . 99 / sq. ft. ($7.95 / tile)

$ 1 . 99 / sq. ft. ($7.95 / tile)
Product Description
Quick Facts
- Made from durable PVC
- Lasts a lifetime
- Waterproof
- Clean with soap and water
- Mold and Mildew resistant.
- Stain Resitant
- Flexible yet strong
- Lightweight and easy to install
- 2x2 Actual Size - 23-7/8" x 23-7/8"
- 2x4 Actual Size - 23-7/8" x 47-7/8"
These thermoform tiles are made from UV Stabilized .013" thick vinyl plastic. They are designed to provide all the functionality of conventional drop ceiling tiles at a fraction of the weight. The feather-light construction makes them a breeze to install, easy to clean, stain resistant, water resistant, dust free, and eco friendly! Installation is fast and couldn't be any easier.
Designed to fit all standard 15/16" - 1" T-Bar Ceiling Systems. Most of the thermoform ceiling tiles come in two sizes, 2'x2' and 2'x4'.
Not recommended for direct mount installation
FYI - If you have a 2x4 grid ceiling, but would prefer the look of the 2x2 ceiling tiles, simply insert a 2' center T bar available online or at most local hardware stores...it's easy!
 5 Year ProShield Warranty
The ceiling tile manufacturer guarantees that your ceiling tiles will be free from manufacturing defects for a period of five years from the date of purchase. Limitations apply. See full warranty information below.
UL Listing/Certification
ProLite ceiling tiles bearing this mark are UL tested and approved drop-out ceiling panels that can be installed beneath fire sprinklers. When exposed to heat from a developing fire, drop-out ceiling panels soften, distort, and fall from the ceiling grid. Heat from the growing fire activates the sprinkler which, unimpeded by the panels, controls or extinguishes the fire.

Highlights:
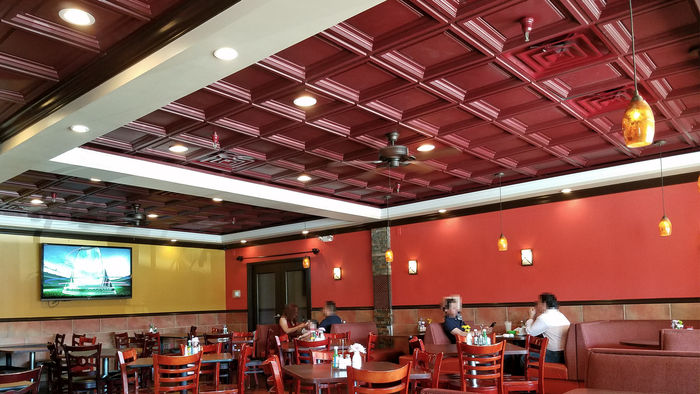
The Westminster Grid tile is popular among our customers who are drawn to the simple elegance of the Stratford style, but prefer a little extra dimension. Since its introduction, it has quickly become a customer favorite. Being that it is Class A Fire rated, it is an excellent choice for most businesses and homes. We are also proud to say that it is made in the USA.
Things to Consider:
The Westminster tile is designed for use in a drop ceiling only. Since it isn't flat on the back, there isn't any surface area to directly attach it to your ceiling.This style recesses up into the grid .81"- That being said, you will want to make sure and plan accordingly to ensure there is enough room between the joists and the grid for to accommodate the tile, plus any existing fixtures, etc.
Your ceiling will more than likely have partial tiles at the perimeter, you will have to cut the tiles to size for those areas. The dimensional qualities of the Westminster do not make it suitable to be used as a partial tile. Not to worry, since we have the perfect solution. The Stratford tile mirrors the style of the Westminster perfectly, and it's flat design makes it the ideal border tile.
If your grid is already white and in good condition, it should match the white Westminster tile very well. If you are going with a colored option, we highly recommend that you consider the Grid Tape or Grid Strips since they are color coordinated with the ProLite collection. If you would prefer to avoid the extra expense, you can of course paint your grid as well.
Greenguard
Greenguard Gold Certification offers strict certification criteria that considers safety factors to account for sensitive individuals (such as children and the elderly), and ensures that a product is acceptable for use in environments such as schools and healthcare facilities. It is referenced by both The Collaborative for High Performance Schools (CHPS) and the Leadership in Energy and Environmental Design (LEED) Building Rating System. Click here for more information.
UL Listing/Certification
Certain ProLite ceiling tiles are approved drop-out ceiling panels that can be installed beneath fire sprinklers. When exposed to heat from a developing fire, drop-out ceiling panels soften, distort, and fall from the ceiling grid. Heat from the growing fire activates the sprinkler which, unimpeded by the panels, controls or extinguishes the fire. Click here for more information.
Waterproof
Materials used in the construction of the tile(s) are 100% waterproof.
Class A Fire Rated
Tiles have been tested in accordance with ASTM 84e and scored a Class A rating for flame spread and smoke generation.
CEILING TILE
5 Year Limited Warranty
You're making a beautiful upgrade to your ceiling and we're here to help protect that investment. We guarantee that your ceiling tiles will be free from manufacturing defects for a period of five years from the original date of purchase.
Warranty Conditions
This warranty covers material defects in the ceiling tile when used in a standard ceiling application where temperatures do not exceed 120F. It does not cover labor, consequential or incidental damages. This warranty is not transferable and applies to the original purchaser only. Please note that painting the ceiling tile will void the warranty and may change some of its properties like its fire rating.
We're Ready to Help
Unlike a car, there is very little that can go wrong with these ceiling tiles. However, in the rare event that you do encounter a defect with your tiles, we're here and ready to help. Just give us a call and we'll work with you to identify the problem and, in case of defect, supply you with replacement tiles.
RETURNS
We know that projects take a while, and sometimes plans change. That's why, we offer a great return policy on all non-custom products:
- 90 day return window with no restocking fees
- Products must be unused/new and in their original boxes
- Customer is responsible for return shipping cost (we are happy to help arrange shipping)
- Partial returns where the quantity discount tier would change are refunded the difference between the original total and the total based on the kept quantity (see example)
How To Install Drop In Ceiling Tiles
Tools Required
- Tape Measure
- Pencil
- Straight edge (optional)
- Scissors or Aviation (Tin) Snips
- Gloves
- Eye Protection
Reusing Your Old Tiles
Have old tiles still in good condition? Reuse them to add heat and sound insulation as well as support regular insulation above your new tiles by pushing your existing tiles up out of place and turning them slightly to rest on top of the grid system. Watch our video
NOTE: this is likely not compliant with commercial building codes, so verify if this is an option.
Insulation Above Tiles - 4 Methods
Due to the Westminster's thin construction, regular fiberglass insulation is too heavy be laid on top. If your space requires insulation above the tiles you have a few options:
- Use SoniGuard insulation: the only insulation that can safely sit directly on top of the Westminster tile.
- Support on your old tiles (see above).
- Place 1x1 or 1x2 wood furring strips across the top of the grid to use as support for insulation.
- Secure the insulation to the "real ceiling" of your space, leaving the tops of the tiles clear of any need to support weight.
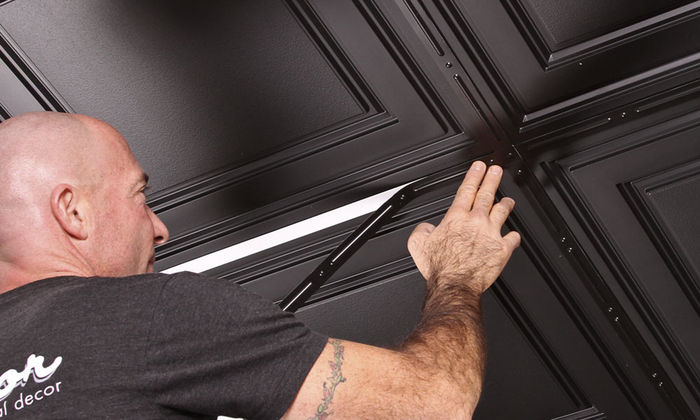
Decorative Grid Strips / Grid Tape (optional)
Make sure your grid system is clean, using rubbing alcohol or 409 to remove dirt and oils.
For best results, make sure the temperature in the room is 60-80F and low humidity.
Glue
Apply small dabs of direct mount adhesive (a.k.a. glue) along the back of the strips or tape every 6 inches or so. For grid tape, drag the dab along the length to spread it out somewhat. The self-adhesive backing on the strips/tape IS NOT a permanent adhesive, it is meant to hold long enough for the glue to cure. Failure to use glue may result in the failure of the strips or tape to adhere to the ceiling.
Approximately 1 tube of adhesive is needed per 5 packs of strips or 5 rolls of tape. We provide Red Devil General Purpose Construction Adhesive free with purchase or you can use Loctite Power Grab All Purpose Adhesive (available locally in most big box stores).
Grid Strips
Should be butted up to one another. Do not overlap! Always start at the same end with each consecutive strip. Always dry-fit first, before peeling off the backing, to see if any trimming is needed.
Take your first strip. The dot at the end should be directly over the intersection of 4 tiles. Once you have the strip lined up, peel the backing from the self adhesive and apply small dabs of adhesive to the back of the strip (see above). Run all the strips one direction first.
Finish by installing the strips that run perpendicular to the tiles. Each strip will need to be trimmed, so keep a pair of scissors or snips in your pocket and cut off the dotted end.
Grid Tape
Start in a corner and work one direction. Apply small dabs of adhesive every 6 inches and drag along the length to spread out somewhat. Trim the tape to fit when you reach the end of a run. Finish off by covering the remaining cross T's (shorter grid sections). Trim the tape to fit the space exactly (do not overlap).
Install Full Tiles First!
Place all of the full sized tiles first so you can:
- Verify that your grid is properly aligned/spaced prior to cutting partial tiles.
- Set aside any tiles with damaged corners to use for border/partial tiles. We ALWAYS gladly replace any tiles damaged in shipping, but if you need to cut tiles for border tiles, you'll end up cutting off 2 corners anyways. This can save you time, save the environment, and help you complete your project perfectly without waiting for replacements.
Border Tiles - 4 Methods
The Westminster ceiling tile is very easy to cut with regular household scissors. Put measurements on the back side of the tile with a pencil or grease pencil, mark a straight line, and cut! For tiles with a decorative design, you have 4 options for the perimeter of your room, choose the one that fits your taste!
- Border tile: If a border tile is recommended above, you can use this to have a flatter design for partial tiles.
- Cut edge against wall: Cut your tile so the cut edge is along the perimeter of the room. You may see some shadowing if your tile recesses above the grid.
- Finished on perimeter: This puts the cut edge on the side opposite the wall. Your repeating pattern from the full tiles will be somewhat interrupted, but shadowing along the cut edge will only be visible if you stand right next to the wall.
- Splice edges: For tiles with a simple, straight design, and a certain size of partial tile, you may be able to cut a strip out the middle of the tile and glue or tape the two halves together to essentially make a custom tile the exact width of your border. If done well, this has the added benefits of continuing the pattern from the full tiles as well as having a finished edge along the wall. However, this method is more time-intensive, can leave a visible overlap line, and doesn't work with all tiles or border widths.
FAQ - Recessed/Can/'Puck' Lights
Choose a tile design that has a large enough flat area for the light bezel to lay flush once installed. As with standard mineral fiber tiles, you must choose lights that have grid mounting brackets so that the weight of the light is supported by the grid system and not the tile . The Westminster is not strong enough to support even newer, light-weight clip-in 'puck' style of LED light. Our heavier-duty Signature Series Ceiling Tiles have worked with certain styles of puck lighting.
Place your light fixture and tile in the grid system. Adjust the light to its final position and mark this on the backside of your tile. Use the template to mark the hole in the tile (usually the light bezel itself will be close if no template is available). Cut the opening with scissors or a razor blade.
Caution
Unshielded fixtures, especially those using halogen lighting, present a risk of fire or melting the tiles.
FAQ - 120°F Max Temperature
The Westminster tile is designed to operate in temperatures up to 120F. Higher temperatures can happen around heat registers, above stoves and ovens, around high temperature lighting, and in environments that intentionally have higher temperatures, like heat spas and Hot Yoga/Bikram studios. Contact us if your space may be subjected to any of these conditions.
FAQ - Uplift in Drafty areas
If you are installing tiles outdoors or near a door, you may find that a few of your tiles have a tendency to lift out of the grid. The very simple fix is to use our Uplift Prevention Clips or tape inexpensive, powerful magnets to the back of the tiles in a few spots to hold it to the grid. 30-pack on Amazon
How to Install Glue-Up Ceiling Tiles
Use Adhesive, Not Staples
Tools Needed
- Tape measure
- Pencil
- Chalk line (recommended)
- Straight edge
- Scissors or Aviation (Tin) Snips
- Adhesive (about 1 tube for every 8 tiles)
- Paper towels and water for clean-up
- Decorative Strips (if not overlapping tiles)
- Eye protection
Surface Types and Methods of Installation
- Sheetrock, Drywall, Plaster, Cement, Wood Paneling, Plywood
Install the tiles directly to the ceiling using an adhesive that is compatible with both the ceiling and the ceiling tile. - Wood Furring Strips
Furring strips are a great solution for rough ceilings that would require a lot of work to fix. Level with shims as you install them to give a flat mounting surface. Space out the furring strips according to your tile spacing determined below. If installing 2x4 tiles, we recommend doing a 2x2 pattern so the middle of the tile can also be adhered. - Popcorn / Stucco / Cottage Cheese Ceilings
Ceiling tiles should never be applied directly to popcorn ceilings. Either remove the ceiling texture, add a new layer of drywall or 1/4" hardiebacker over the surface, or install furring strips. NOTE: If removing texture installed before the mid-1980's, test beforehand for asbestos, which may require removal by a licensed contractor.
Important Note about Tile Center
Due to the manufacturing process, the width of the flat border around a ceiling tile isn't always perfectly uniform. NEVER use the outside edge of the tile to determine placement. Instead, use the edge of the tile design (just inside the flat border).
Determine Tile Spacing
| Using Grid Strips | Overlapping (no strips) |
|---|---|
| Required for ProLite, optional for Legacy and Designer | Required for Manchester Ceiling Tile, optional for Legacy and Designer Series |
| Spacing exactly 24"x24" or 24"x48" is recommended, as it leaves a small gap that the grid strip will cover (test the spacing with two tiles and a grid strip). | Place a few tiles on the floor and determine your preferred overlap. Measure the tile spacing between corners of the tile design in this position. The grid you draw later will be smaller than your tile due to the overlap (e.g. if your tile is 23 3/4" and you have a 1/2" overlap, you will draw your grid at 23 1/4"). Note: Everywhere 4 adjacent tiles overlap, the tile thickness compounds. Often, the ceiling height makes this unnoticeable. However, if desired, you can trim 2 or 3 tiles to minimize the thickness. |
Planning Your Layout
Use grid paper and map out your ceiling. Indicate the position of lights, vents, and any other fixtures or obstructions to help determine your layout.
Note: If the ceiling tile you have chosen has a large amount of relief, consider using a flatter border tile in the spaces where there are lights, vents or other obstructions.
Consider the main, most visible area of your space as well as the longest runs of tiles. These are usually the lines you want square to your starting wall (used as the base for your lines). Most rooms are not square and many times tile layout is a compromise of room shape and border tile size needs.
Using the tile spacing you determined earlier, add the tile grid to your drawing. Many people prefer equal width border tiles on opposing walls. Also, a larger border is often preferred over a small one (e.g. in an 11' wide room many people prefer 4 full tiles and 2 18" wide border tiles over 5 full tiles and 2 6" wide border tiles).
Mark Grid On Ceiling
Use a chalk line (or pencil) to put your layout onto the ceiling to keep everything straight. Be precise; if you are off by only 1/8" on each tile, after 8 tiles you will be off a whole inch!
| Using Grid Strips | Overlapping (no strips) |
|---|---|
| Draw a grid according to your determined spacing. Each tile will be placed with the tile design (not the flat edges) centered in the grid. | Draw a "t" (horizontal and vertical line) from the top left corner of the tile design (not the flat edge!) of the starting tile. While you can draw a full grid, many people don't find this necessary. For added precision, you can add hash marks along the "t" at your determined spacing. |
Before You Begin
Your surface needs to be smooth, clean, and dry. Test your adhesive and tile combination in a small area before committing to doing the whole ceiling.
Installing the First Tile
Make sure all surfaces are clean, as well as your hands. Any oils on the ceiling, tiles, or your hands can affect the adhesive performance. Latex gloves are a great option, keeping oils off the tiles and keeping your hands clean of adhesive.
Apply a bead of adhesive all the way around the perimeter of the backside of the tile. Make the bead 1/8" to 3/16" in size. If the tile center lays flat on the ceiling, add a 4" "X" to the center section with adhesive. If the tile has a design where only a few areas touch the ceiling, place dabs of adhesive on those sections. Keep a damp towel handy to clean up any adhesive that may seep out.
| Using Grid Strips | Overlapping (no strips) |
|---|---|
| Install tile with the tile design (not edges) centered in its "grid" box, not touching any of the lines. | Align the top left corner of the tile design to the center of the "t". |
Gently place the tile close to its final location next to your chalk lines. Lightly press the tile to the ceiling as you slide it into position. This lets the adhesive spread out and smear a bit. Once you are satisfied that the tile is in place, firmly press it to the ceiling, rubbing out any bumps in the adhesive.
Subsequent Tile Placement
| Using Grid Strips | Overlapping (no strips) |
|---|---|
| Install all remaining full tiles using same method as the first tile. Tile edges should NOT be touching. Dry fit the Grid Strip to confirm you are placing the tiles with the correct spacing. | Work outwards along the "t" from the first tile, aligning the top left corner of each tile design to its respective hash mark on the "t". Once the full tiles on the "t" are complete, install remaining full tiles, using the edges of the tile design from previously placed tiles to determine horizontal and vertical placement. |
Border Tiles
Measure the open space from the installed tile to the wall, adding overlap if not using grid strips. Make sure to take measurements at each end of the space, as the measurements are often different due to inconsistencies in construction. Make sure the tile is facing the correct direction. Transfer your measurements to your border tile and cut it.
Decorative Strips
For best results, make sure the temperature in the room is 60-80F and low humidity.
Glue
Apply small dabs of direct mount adhesive (a.k.a. glue) every 8 inches (one at each end and two spaced in the middle). The self-adhesive backing on the strip IS NOT a permanent adhesive, it is meant to hold long enough for the glue to cure. Failure to use glue may result in the failure of the strips to adhere to the ceiling.
Approximately 1 tube of adhesive is needed per 5 packs of strips. We provide Red Devil General Purpose Construction Adhesive free with purchase or you can use Loctite Power Grab All Purpose Adhesive (available locally in most big box stores).
Strips should be butted up to one another. Do not overlap! Always start at the same end with each consecutive strip. Always dry-fit first, before peeling off the backing, to see if any trimming is needed.
Take your first strip. The dot at the end should be directly over the intersection of 4 tiles. Once you have the strip lined up, peel the backing from the self adhesive and apply adhesive to the back of the strip (see above). Run all the strips one direction first.
Finish by installing the strips that run perpendicular to the tiles. Each strip will need to be trimmed, so keep a pair of scissors or snips in your pocket and cut off the dotted end.
CUSTOMER REVIEWS
65
4.8 out of 5 stars
SHOP BY DEPARTMENT
andersonthunt1937.blogspot.com
Source: https://www.udecor.com/Westminster-Ceiling-Tile-Black.html
0 Response to "Easy Elegance Deep Black Coffered Ceiling Tiles"
Post a Comment